Step By Step Order Guide For Flexible Moulding
The following is a step by step guide with tips to assist you in ordering flexible mouldings to fit your particular requirements.
Be sure to have all of the neccessary ordering requirements covered.
Step 1: How will my Pro-Flex flexible moulding be bent?
Straight pieces: no pre-bending required

Straight lengths of flexible moulding are used when the profile is to be bent against it’s thinner measurement as with a baseboard, a chair rail or an inside window jam or door liner. For these applications, bending of the flexible moulding profile may be done on-site.
Curved Moulding: pre-bent to a required radius
For round top window casing, door casings or crown moulding applications the flexible moulding must be pre-bent to conform to your required measurements.
Since the moulding is flexible, it will allow for some adjustments on site; but it is necessary that we receive these measurements to assure a perfect and convenient fit.
There are two basic types of curves to choose from as shown below:


Elliptical or Oval Applications:
An elliptical or oval application has a number of different radius measurements throughout the curve. Unlike the eyebrow or the half circle, an elliptical profile is not part of a full circle. As it is impossible to know where each different curve of the moulding would begin and end, we always require a template to be sent to be sure that the correct shape and curved of moulding is achieved.
A template can be made of cardboard or even paper.
Straight lengths of flexible moulding will require:
Length of the individual pieces required.
There is a minimum length which is typically 4 feet and a maximum length per individual piece which is typically 12 feet. If a length greater than 12 feet is necessary, we will supply parts in the largest divisible lengths to meet your requirement. (e.g: for a 16′ requirement, we might send two 8 foot pieces, unless otherwise instructed)
How many pieces are required at that length
Half Circles:
Figure out the radius of the circle taken from the inside of the arch or window edge.
This may be calulated by dividing the diameter by 2.
Or it is also the distance from the line across the bottom of the arch to the top of the arch as shown to the right.
A quick test to be sure that the curved moulding that you require is a half circle and not an eyebrow, is that a half circle has a diameter that is twice the radius, in other words, the width across is twice the distance of a line taken from the center to the the edge of the half circle
Full Circles:
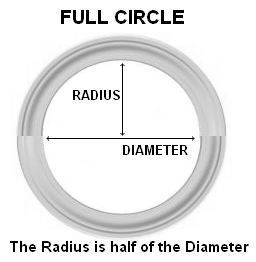
Full circles are typically calculated as two half circles. To order a full circle:
Figure out the radius of the circle taken from the inside of the arch or window edge.
This may be calculated by dividing the diameter by 2.
Or it this is also the distance from the line across the bottom of the arch to the top of the arch as shown to the right.
Use the calculator for half circles when prompted to do so and then follow the instructions for ordering full circles.
Quarter Circles:
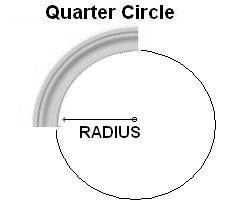
Quarter Circles circles are typically calculated as half of a half circle.
Find the radius, which is the measurement from what would be the center of a full circle, to the edge of the arch.
Use the calculator for half circles when prompted to do so and then follow the instructions for ordering a quarter circle, which will be half of the amount of moulding required for a half circle.
For Eye Brows:
The measurement from the beginning of one side of the arch to the point at which it ends. This is referred to as “the width”.
The measurement from the line that would be drawn for the width to the top of the arch. This is refereed to as “The Rise”.
Be careful when measuring the rise that you are not measuring too far down the window or arch, beyond where the curve starts on the left and right.
The number of individual pieces required.
There is a minimum length which is typically 4 feet and a maximum length per individual piece which is typically 12 feet. If a length greater than 12 feet is necessary to complete one ordered piece, we will supply parts in the largest divisible lengths to meet your requirement. (eg: for a 16 foot requirement per piece ordered, we might send two 8 foot pieces, unless otherwise instructed)
Using these measurements, the calculators provided on the ordering pages will calculate the actual radius of the arch and the length that you will need to complete it along with the necessary miter cuts at both ends to match up to a wood profile.
For Elliptical Mouldings and Ovals:
- The length of the moulding required.
- This can be figured out by laying a measuring tape or string out along the edge of the template alowing for a bit of overlap and remembering that the outside of the profile travels a longer distance that the inside of the profile. We will double check this once your template arrives.
- The number of individual pieces required.
- There is a minimum length which is typically 4 feet and a maximum length per individual piece which is typically 12 feet. If a length greater than 12 feet is necessary to complete one orderred piece, we will supply parts in the largest divisible lengths to meet your requirement. (for ex: for a 16 foot requirement per piece ordered, we might send two 8 foot pieces, unless otherwise instructed). A template can be made of cardboard or even paper or plastic.
Flexible Crown Moulding Profiles:
The above examples of Half Round, Eye Brow and Elliptical curved mouldings may be used for measuring radiuses and lengths for flexible crown moulding profiles. Simply picture the arch of the crown moulding as though you are looking down on it from above.
Since crown mouldings not only bend around the wall, but tend to sit on the wall on an angle, there are a couple of additional bits of information that are most important:
- Will the flexible crown moulding be bent as an Inside Radius (Convex moulding) or an Outside Radius (Concave moulding)?
- Will the flexible crown moulding be mounted on the wall with the top as shown in the diagram? . . . or upside down?
- Some people find that a crown moulding profile looks better one way rather than the other. That’s fine, as long as we know this to be the case. We will bend all flexible crown mouldings with the top as shown in the diagram on the order page unless otherwise instructed when asked during the ordering process.
Are you installing an inside radius or an outside radius crown moulding?
Inside Radius:

As if the flexible crown mouldings was fitting into the wall.
Outside Radius:

As if the flexible crown moulding was curving out from the wall.
Special consideration for crown moulding being used in portico, dormer, picture frame or internal liner applications.
One of the significant benefits of Pro-Flex flexible moulding are the many applications in which a curved molding may be used.
For the following applications, you would normally think to use an inside radius, that’s fine, but it is important to point out that this is a dormer or picture frame application when ordering.
This applies to:
- A picture frame application where the crown molding is be mounted around the inside of the frame.
- If used at the end of a hallway with a barrel ceiling to connect to a molding that runs down the hall and them up around the barrel portion at the end of the hall.
Inside a dormer or portico creating a picture frame like appearance
Check out our TIPS FOR MEASURING page
We have compiled a whole list of different tips and tricks with diagrams to assist you in understanding and getting the required measurement for your flexible moulding order.